
Note: this borrows material from this topic on UKTrainSim.com. Thanks to those brave experts!
Some rolling stock such as cars and engines have child components such as lights, sounds, drivers and cameras whose position can be modified. This is also the case for some scenery items such as vehicles on a traffic ribbon.
3D games such as Railworks store information about the position, scaling and spatial orientation of objects in 3D position matrices.
For cameras, an easy way for doing this is by using Claudio's "RW Camera Cab Position" tool. It is payware, but there is no lower limit for the donation. It has a GUI that lets you position head-out or passenger view cameras and it will update the camera's position matrix for you.
For other child objects, or for those who prefer hacking the files, it is possible to edit the matrix directly in the xml blueprint or in GeoPcDx shape files. A matrix looks like this in an xml blueprint:
<Matrix>
<cHcRMatrix4x4>
<Element>
<e d:type="sFloat32" d:alt_encoding="000000A090F2EF3F" d:precision="string">0.99</e>
<e d:type="sFloat32" d:alt_encoding="00000020E945ADBF" d:precision="string">-0.05</e>
<e d:type="sFloat32" d:alt_encoding="000000A0F02E673F" d:precision="string">0.02</e>
<e d:type="sFloat32" d:alt_encoding="0000000000000000" d:precision="string">0</e>
<e d:type="sFloat32" d:alt_encoding="000000A0F5B7AC3F" d:precision="string">0.05</e>
<e d:type="sFloat32" d:alt_encoding="000000E009A1EF3F" d:precision="string">1</e>
<e d:type="sFloat32" d:alt_encoding="00000000020FC23F" d:precision="string">0.14</e>
<e d:type="sFloat32" d:alt_encoding="0000000000000000" d:precision="string">0</e>
<e d:type="sFloat32" d:alt_encoding="00000040A27B86BF" d:precision="string">-0.01</e>
<e d:type="sFloat32" d:alt_encoding="000000008E04C2BF" d:precision="string">-0.14</e>
<e d:type="sFloat32" d:alt_encoding="000000C0EEADEF3F" d:precision="string">1</e>
<e d:type="sFloat32" d:alt_encoding="0000000000000000" d:precision="string">0</e>
<e d:type="sFloat32" d:alt_encoding="00000020034085BF" d:precision="string">-0.37</e>
<e d:type="sFloat32" d:alt_encoding="000000C0CCCC0840" d:precision="string">3.1</e>
<e d:type="sFloat32" d:alt_encoding="000000E021371F40" d:precision="string">7.8</e>
<e d:type="sFloat32" d:alt_encoding="000000000000F03F" d:precision="string">1</e>
</Element>
</cHcRMatrix4x4>
</Matrix>
To get the matrix from a GeoPcDx file, open it with RWTools and find the 'SourceLToPTransform' data block and the first series of sixteen data elements which typically look like this:
<SourceLToPTransform>
<e d:numElements="16" d:elementType="sFloat32" d:precision="string">0.9900 -0.0500 0.0200 0.0000 0.0500 1.0000 0.1400 0.0000 -0.0100 -0.1400 1.0000 0.0000 -0.3700 3.1000 7.8000 1.0000</e>
In both above examples, the values are shown in red. There are 16 of them. You must think of these 16 values as a 4 x 4 matrix, arranged as follows.
1 5 9 13
2 6 10 14
3 7 11 15
4 8 12 16
This is the position of each value in the 4x4 matrix. So the value on first line in the above xml node (0.99) is at the top-left corner in the matrix:
0.99
0.05
-0.01
-0.37
-0.05
1
-0.14
3.1
0.02
0.14
1
7.8
0
0
0
1
3D programs interpret the matrix as follows:
http://en.wikipedia.org/wiki/Rotation_matrix
The top left corner (positions 1, 5, 9, 2, 6, 10, 3, 7 and 11) is a 3x3 rotation matrix
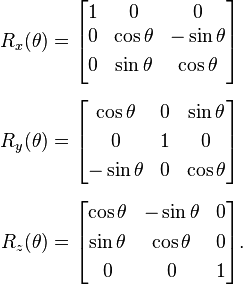
Top to bottom, rotation around X, around Y, around Z. You need to multiply (matrix multiply, not math multiply) the existing matrix with that, not just replace it, or you will lose any scaling.
To rotate the object horizontally through 180 deg. set elements 1 and 11 to -1.0000.
To rotate the object horizontally clockwise through 90 deg. set elements 1 and 11 to 0.0000, set element 3 to -1.0000 and element 9 to 1.0000.
To rotate the object horizontally anticlockwise through 90 deg. set elements 1 and 11 to 0.0000, set element 3 to 1.0000 and element 9 to -1.0000.
If you want to rotate in two or three dimensions you need to make a matrix for each rotation, and then multiply them together. It seems rotations are always around the local origin of the object which simplifies things enormously ( you don't need to worry about rotating and then translating vs translating and rotating, it's not the same thing! ).
There is an on-line rotation matrix calculator that will calculate matrix values for your desired changes. Remember, you need to multiply the existing matrix with that, not just replace it.
The last column, 13-14-15 is for translation ( ie positioning )
To offset object sideways, adjust element 13 (increasing value moves object left)
To change object height, adjust element no. 14 (increasing value raises object)
To offset object forwards or backwards adjust element 15 (increasing value moves object backwards)
Scaling is along the top-left to bottom-right diagonal.
Fairly obvious, position 1 is scaling by X, 6 is scaling by Y, 11 is scaling by Z, and 16 really should scale all of them - but trying this has produced some rather odd results.
The File Library has been transferred to the new web site. 913 files were moved and added to the web site. A very mundane task to say the least. Thanks to Kieth (oldgreyowl) the job went much faster.
All files are now available but in order to save time, some of them do not have screenshots or descriptions yet. This will be added as time goes by. Files without pictures are mostly the very old files.
Now on to bigger and better things for RWA.
Various versions and liveries of EMD's famed 'Cadillac', the EMD SD7 and SD9, are available for free on my website. The available liveries include:
You can find out more and download the models on my website.


A freeware model of a gas-electric railcar, also known as 'Doodlebug', is available at Golden Age of Railroading. The railcar is a model of Montana Western Railroad's number 31, a former Great Northern car, but is also available in Boston & Maine colors and in the livery of the fictional RW&A railroad.
You can find out more and download the models on my website.


TS2013 Paint Your Wagon Tutorial
TS2013 Scenario Creation Tutorial
TS2013 Scenario Creation Tutorial Part 2 Passenger Operations
TS2013 Scenario Creation Tutorial Part 3 Freight Operations
Railworks 2 Legacy Tutorials
Download Marleyman's tutorials
Note: these are free products on Marleyman's store.
You have to register and "buy" the scenarios for 0$.
By Bob Latimer
If you have gone through my tutorial entitled “How To Get Most Third-party Routes Running in TS2013“ and followed its steps and then find out that you can load the route in the Editor and can run some of the scenarios, but not all of them, it is possible that the scenarios that still won’t run have too many Provider/Products (P/Ps) selected creating TS2013 overload.
It appears that some scenario writers start by selecting (ticking) all of the P/Ps that they may possibly need for the scenario but never go through them at the end and remove the ones that aren’t used.
Now the challenge is to figure out how to change the scenario so that it has the appropriate P/Ps selected, and only the required ones, when you can’t open it in the editor.
I developed the following approach, which may not be the most efficient, but it worked for me. It does require a little .xml file editing, but that can’t be avoided.
By Bob Latimer
Many TS2013 users are having problems, and getting SBHHs, when trying to run third-party routes under
TS2013. There are various reasons for this and the main ones are:
Thanks to Mike Simpson’s RW_Tools, there are methods of reducing and potentially eliminating these issues and getting almost all third-party routes to run.

Our first ProLine scenariopack is now available here
We have 2686 guests and no members online