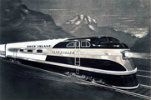
it actually works out better to start with the uv maps and build from there. That will allow me to build layers for base color, shading, dirt all kinds of things that are nearly impossible when painting over a pre painted model. complicating that is the problem that each piece of the engine ( or rolling stock in the case of cars ) is located on a different segment of the page. This is fine in situations where everything is the same exact color, but in more complex situations where more than one color is used and the design takes on mo0re complexity, you need to now exactly where every part begins and ends in order to create an accurate reproduction. Taking the rock island heritage es44ac as an example, the white line that encircles the engine on the top, is interrupted where the top part of the nose drops down to meet the front of the nose. and The front of the nose, though its connected on the texture sheet to the side of the engine, is scaled differently than the rest of the engine, giving any pattern a squished and out of place appearance. On the front part of the UP DD40, everything is yellow and non-discript so there are no edges to use to place colors or logos or decals properly.. Thats where a paint kit comes in real handy. its just a set of wire scren images placed onto a texture sheet which show the outline of each part of the item to be painted, allowing for efficient and exact placement of colors, logos decals, and designs..
Heres a part of the P-61 black widow paint kit. it might help clear up any confusion i might cause..