
New York Division-Bergen Line: Episode III, The Erie Rises
Re: New York Division-Bergen Line: Episode III, The Erie Rises
![]() by PennCentral670 » Thu Oct 03, 2019 8:02 am
by PennCentral670 » Thu Oct 03, 2019 8:02 am
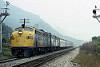
This may not be Bergen related but decided to do some Erie-Lackawannin' over the Hudson yesterday with a westbound PC manifest bound for Maybrook then onto Campbell Hall.
You do not have the required permissions to view the files attached to this post.
-
PennCentral670 - Posts: 152
- Joined: Tue Jun 21, 2016 10:17 am
- Location: Westchester County, New York
Re: New York Division-Bergen Line: Episode III, The Erie Rises
![]() by minerman146 » Thu Oct 03, 2019 11:06 am
by minerman146 » Thu Oct 03, 2019 11:06 am
(I am doing a 3 in 1 post here)
Penn! Holy Crap its the Poughkeepsie Bridge!
(Use yard track so yer ballast isnt hanging off the side of the bridge or widen the Bridge)
Are you going to Maybrook to get your 1960s on? Really great shots of your wonderful bridge.. . it looks great!
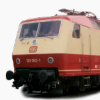
Buzz! Love the FA! what do I need to by so i can lovingly apply your repaint?
Last up: All you guys who wanted me to go to Port Jervis are weenies! (Talking to you Penn)
Below is a lovely picture of a scene I will need to build.
Nice its 87 miles to Hoboken ... uh not quite. That's 87 miles on the Old Main line NOT via the Graham. Lets go to Wikipedia cuz I would rather cut and paste. For you careful readers, this should wrap up a few loose ends from my last post.
Built in 1904–1908 as a low-grade freight line. The Graham Line bypasses the original Erie Main Line through Monroe, Chester, Goshen and Middletown. Grade on the Graham Line was not to exceed 0.2% eastward or 0.6% westward, while the original Main Line built in the 1840s had grades up to 1.25%. There were three places where freight trains needed a helper on the old line and none on the new, but just west of the cutoff the grade up from Port Jervis to Guymard could not be improved and remained unchanged as the only place in the area needing a helper. The sharpest curve on the old line was 7 degrees and on the new was 1 deg 30 min. The Graham Line has no grade crossings, a rarity on the Erie. The downside of the improved grade and curvature is that the Graham Line is seven miles longer. Maintaining the desired grade required two notable engineering features, the Moodna Viaduct and the Otisville Tunnel.
7 MILES LONGER
This is great except the MP designations for the Graham stop and MP76.7 at Howells, Junction. Going West the original Old Main Line MPs are used. So at Howells JCT its 76.7 on the Graham and 69 on the Old Main. And they carry this on to our signal at Port
Jervis. So, the 87.2 is accurate IF we were going on the OLD main, but in reality its 94 Miles Seriously ?
?
So THIS explains what I saw last night when I finally laid my track at Otisville and stopped the track at the portal. So, I wanted to get a reading of how many miles it is to Hoboken from Otisville.
Why look at that ... its EIGHTY DARN MILES and TWO HOURS to Hoboken!
Seriously, you guys are going to sit in the cab, on the Bergen, for 2.5 hour runs from Port Jervis? Now I did this in real life, and my father got PAID running this. As I told my father a few weeks ago ... "Dad, I dont understand why anyone would want to drive from Port Jervis, the railroad doesnt even get interesting until Suffern." My father's response "Well you said it, I didnt!"
When this gets done, I expect to see some driving by you guys. And if I hear one "Well, the Bergen is too long for me to drive, I prefer short routes like Adriana Falls" I am going to hunt that guy down and badger him for the rest of his days.
I have to put in 7 more miles than I was mentally prepared for. And based on what I said about crossing the Delaware in to Pennsylvania, and if I go a mile past old No.2 Bridge and around the bend past Cherry Island ... that will give me 99 miles.
And THAT IS ENOUGH!
Carry On!
Penn! Holy Crap its the Poughkeepsie Bridge!
(Use yard track so yer ballast isnt hanging off the side of the bridge or widen the Bridge)
Are you going to Maybrook to get your 1960s on? Really great shots of your wonderful bridge.. . it looks great!
Buzz! Love the FA! what do I need to by so i can lovingly apply your repaint?
Last up: All you guys who wanted me to go to Port Jervis are weenies! (Talking to you Penn)
Below is a lovely picture of a scene I will need to build.
Nice its 87 miles to Hoboken ... uh not quite. That's 87 miles on the Old Main line NOT via the Graham. Lets go to Wikipedia cuz I would rather cut and paste. For you careful readers, this should wrap up a few loose ends from my last post.
Built in 1904–1908 as a low-grade freight line. The Graham Line bypasses the original Erie Main Line through Monroe, Chester, Goshen and Middletown. Grade on the Graham Line was not to exceed 0.2% eastward or 0.6% westward, while the original Main Line built in the 1840s had grades up to 1.25%. There were three places where freight trains needed a helper on the old line and none on the new, but just west of the cutoff the grade up from Port Jervis to Guymard could not be improved and remained unchanged as the only place in the area needing a helper. The sharpest curve on the old line was 7 degrees and on the new was 1 deg 30 min. The Graham Line has no grade crossings, a rarity on the Erie. The downside of the improved grade and curvature is that the Graham Line is seven miles longer. Maintaining the desired grade required two notable engineering features, the Moodna Viaduct and the Otisville Tunnel.
7 MILES LONGER
This is great except the MP designations for the Graham stop and MP76.7 at Howells, Junction. Going West the original Old Main Line MPs are used. So at Howells JCT its 76.7 on the Graham and 69 on the Old Main. And they carry this on to our signal at Port
Jervis. So, the 87.2 is accurate IF we were going on the OLD main, but in reality its 94 Miles Seriously
? So THIS explains what I saw last night when I finally laid my track at Otisville and stopped the track at the portal. So, I wanted to get a reading of how many miles it is to Hoboken from Otisville.
Why look at that ... its EIGHTY DARN MILES and TWO HOURS to Hoboken!
Seriously, you guys are going to sit in the cab, on the Bergen, for 2.5 hour runs from Port Jervis? Now I did this in real life, and my father got PAID running this. As I told my father a few weeks ago ... "Dad, I dont understand why anyone would want to drive from Port Jervis, the railroad doesnt even get interesting until Suffern." My father's response "Well you said it, I didnt!"
When this gets done, I expect to see some driving by you guys. And if I hear one "Well, the Bergen is too long for me to drive, I prefer short routes like Adriana Falls" I am going to hunt that guy down and badger him for the rest of his days.
I have to put in 7 more miles than I was mentally prepared for. And based on what I said about crossing the Delaware in to Pennsylvania, and if I go a mile past old No.2 Bridge and around the bend past Cherry Island ... that will give me 99 miles.
And THAT IS ENOUGH!
Carry On!
You do not have the required permissions to view the files attached to this post.
"In business, I prefer to keep company with honest men, so I ship on the Erie"
-

minerman146 - Posts: 2507
- Joined: Fri Mar 20, 2015 8:15 pm
- Location: Cornwall, New York
Re: New York Division-Bergen Line: Episode III, The Erie Rises
![]() by kris120 » Thu Oct 03, 2019 11:45 am
by kris120 » Thu Oct 03, 2019 11:45 am
To be honest, I loved driving from Colton to Trona and back (ottodad's route).
And I didn't do this just once !
And I didn't do this just once !
-
kris120 - Posts: 470
- Joined: Mon Jul 22, 2013 3:19 pm
- Location: Augsburg, Bavaria, Germany
Re: New York Division-Bergen Line: Episode III, The Erie Rises
![]() by AmericanSteam » Thu Oct 03, 2019 1:00 pm
by AmericanSteam » Thu Oct 03, 2019 1:00 pm
kris120 wrote:To be honest, I loved driving from Colton to Trona and back (ottodad's route).
And I didn't do this just once !
I had a brother that lived in Trona for a while. His words, "people don't go to Trona they come from there."
Just an old Alaska guy trying to live in an insane world. Degree in life, Masters in common sense.
-

AmericanSteam - Posts: 2855
- Joined: Mon Nov 02, 2015 9:54 am
- Location: Nikiski, Alaska
Re: New York Division-Bergen Line: Episode III, The Erie Rises
![]() by minerman146 » Thu Oct 03, 2019 5:56 pm
by minerman146 » Thu Oct 03, 2019 5:56 pm
AmericanSteam wrote:kris120 wrote:To be honest, I loved driving from Colton to Trona and back (ottodad's route).
And I didn't do this just once !
I had a brother that lived in Trona for a while. His words, "people don't go to Trona they come from there."
They say the same thing about Port Jervis.
What I would like to know before I die building the City of Port Jervis is will people use this route for scenarios as I originally planned? Does the route have everything it needs for interest, functionality and operations? 99 miles with a freight yard at each end, and a 94 mile commuter train run - holy smokes!
"In business, I prefer to keep company with honest men, so I ship on the Erie"
-
minerman146 - Posts: 2507
- Joined: Fri Mar 20, 2015 8:15 pm
- Location: Cornwall, New York
Re: New York Division-Bergen Line: Episode III, The Erie Rises
![]() by Overshoe » Thu Oct 03, 2019 7:45 pm
by Overshoe » Thu Oct 03, 2019 7:45 pm
minerman146 wrote:What I would like to know before I die building the City of Port Jervis is will people use this route for scenarios as I originally planned? Does the route have everything it needs for interest, functionality and operations? 99 miles with a freight yard at each end, and a 94 mile commuter train run - holy smokes!
Yes, with commuter AI and an occasional AI freight to work around, working the yards and the local pickups and deliveries is the stuff of scenarios
-Tom Constantine
Acer Nitro N50-656, Core(TM) i5-14400F, 16 GB RAM, NVIDIA GeForce RTX 3050 /8GB, Win11 64bit up to date. Acer 23" monitor @ 1920x1080 x2
Acer Nitro N50-656, Core(TM) i5-14400F, 16 GB RAM, NVIDIA GeForce RTX 3050 /8GB, Win11 64bit up to date. Acer 23" monitor @ 1920x1080 x2
-

Overshoe - Posts: 575
- Joined: Mon May 26, 2014 4:49 pm
- Location: Bangor, Maine
Re: New York Division-Bergen Line: Episode III, The Erie Rises
![]() by minerman146 » Sun Oct 06, 2019 12:17 pm
by minerman146 » Sun Oct 06, 2019 12:17 pm
OTISVILLE TUNNEL:
Got track out a mile past the mid-section of the tunnel.
KEY POINTS:
Grades in tunnel: UP 0.25 for 634 meters, then UP. 0.11 for 704 meters then DOWN for 543 Meters
IMAGES SHOWING GRADE FIDELITY
I am NOT screwing around with these grades. For what ever reason, grades are consistent with the topo. I am making sure I have accurate Mile Post placement to correspond to the grades. And here on in there is little room for error. Note how I match that darn slope in the track ... this is what were talking about right here.
I would be dead without this information.
Overall its coming on freaking great. The curves have great super elevation and the tunnel is a full mile of loud darkness.
I am glad I'm doing this. But the 'The route doesn't go to Port Jervis" guys are and will always be weenies in my book. For you cool kids who appreciate this as an art form - The Pabst Blue Ribbon is for you.
Carry On.
You do not have the required permissions to view the files attached to this post.
"In business, I prefer to keep company with honest men, so I ship on the Erie"
-
minerman146 - Posts: 2507
- Joined: Fri Mar 20, 2015 8:15 pm
- Location: Cornwall, New York
Re: New York Division-Bergen Line: Episode III, The Erie Rises
![]() by AmericanSteam » Sun Oct 06, 2019 2:09 pm
by AmericanSteam » Sun Oct 06, 2019 2:09 pm
All in the details my friend. I will run a second trick today.
Just an old Alaska guy trying to live in an insane world. Degree in life, Masters in common sense.
-
AmericanSteam - Posts: 2855
- Joined: Mon Nov 02, 2015 9:54 am
- Location: Nikiski, Alaska
Re: New York Division-Bergen Line: Episode III, The Erie Rises
![]() by kris120 » Sun Oct 06, 2019 3:13 pm
by kris120 » Sun Oct 06, 2019 3:13 pm
Just one thing about portals and quickdrives:
You should make it possible for the longest train to fit between the last link of the last signal and the portal.
And for AI traffic in quickdrives on the single-lane sections north of Hariman:
You can have an AI train enter a station, but you can't get it out of the station.
That's why I think it would be very useful if there were portals shortly before the exit signals in the stations.
Oh, the route will be perfect
Kris
-
kris120 - Posts: 470
- Joined: Mon Jul 22, 2013 3:19 pm
- Location: Augsburg, Bavaria, Germany
Re: New York Division-Bergen Line: Episode III, The Erie Rises
![]() by minerman146 » Sun Oct 06, 2019 4:46 pm
by minerman146 » Sun Oct 06, 2019 4:46 pm
Kris,
Can you map that out for me. I will install per your specifications. We have 2 weeks to the next update.
Your technical assistance is always appreciated!
Can you map that out for me. I will install per your specifications. We have 2 weeks to the next update.
Your technical assistance is always appreciated!
"In business, I prefer to keep company with honest men, so I ship on the Erie"
-
minerman146 - Posts: 2507
- Joined: Fri Mar 20, 2015 8:15 pm
- Location: Cornwall, New York
Re: New York Division-Bergen Line: Episode III, The Erie Rises
![]() by minerman146 » Wed Oct 09, 2019 8:54 pm
by minerman146 » Wed Oct 09, 2019 8:54 pm
It is time again for a fresh edition of the Wednesday Route Report.
So, lets check that status shall we?
[ X ] I said some where around October 18th
[ ] Yay, its October 18th.
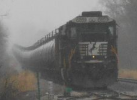
Truth be told I will be lucky to get the scenery I have to do in 10 short days. But, hey, it could happen. Last week, I left you off with a post about Howell's junction and then followed up with another about the Otisville Tunnel. In the past week, I have laid out track to MP76, installed the road network to just beyond tunnel, completed all bridging, and finally, this morning, starting working on scenery again. I am bringing back our map of Otisville to show where we are at. As you can see we are 12 miles West of Middletown Station and 9 miles West of the track I released on August 19th, almost 2 months ago. What you see in this image is my effective work area until the next release. Now I had been telling you that the scenery was extended to Bowser Road. It is, but parts of it are only at 50%. So now I have 8 miles of trees, grass, houses and telephone poles to put in, plus part or all of the Village of Otisville, NY. The good news is this area is sparsely populated, though there are housing clusters in my area of scenery. Not a big deal - I got this.
What I did spend a boat load of time on was getting the track just perfect, to approach and then run my tunnel through the Shawangunk Mountain Range. The tunnel will be an interesting feature. Currently it is missing its cut rock interior, but it is completely concrete lined and in perfect proportion to the real thing. In fact, the tunnel at the center is 24foot I have mine set at 8 meters (26.24 ft). I have a 'scootch' more to allow for variance in my concrete liner, grade and for some room to add rock. I love these close tolerances it shows off my grande huevos in this project! Testing with double stacks and auto racks was just perfect. But the star is really the track. The grades are dead-on. Even better is the super-el as we have quite the number of curves that really get that photogenic lean goin on with the train. The picture below is the real deal at MP76 and on the route - it looks just like this ... wow!
One thing I didn't mention from my last post was where the heck was the original grade BEFORE the Graham and how did it go over Otisville. 4 Miles West of where the track ends is a place called Guymard. At this place the Old Main climbed up a 1.6% grade to go over the mountain. The original alignment is parallel to the tunnel at Otisville about 200ft to the South. You can see the break in the trees where it laid on Google Maps. Anyway this grade required helpers and the Graham eliminated that need for freight. but they kept it in service for another 45 years for light freight and passenger that ran trough Middletown et all to Harriman. This picture is for my father, who has tried to describe to me how it looked in the 1950s. The center tracks are the Old Main and you can sure see the grade going up, but the Graham goes below it to get to the tunnel - on the two outside tracks! (Read more about that here: http://www.railroad.net/viewtopic.php?f=85&t=54241)
Last up is a shot of the Otisville tunnel uh, nekkid. You might recognize the Sherman Hill 1 track tunnel portal here. But how I made this work was clever. The tunnel objects are parallel to the grade of the track (.25 up, .11 up, and .18 down). How I did it. As you know when you first lay down an object and touch it with the Rotate Widget the perpendicular wheel is lined with object. What I did was to place the object down, then lay track to match the grade of the tunnel section. Then I rotated (by manipulated the numbers representing that axis) until object was parallel the track. Then I lined the object (portal) to the working track, centered, sank it, and checked the distance above the rail to the center of the part to 8 meters. I like round numbers for this reason!. So I was able to have the tunnel rise and fall correctly the grade. Now the reason I did this was there really wasn't decent unfinished tunnel ribbons to work with, and when I used the tunnel from NJCL it messed up the track, in addition to being incorrect.
So in the end and as of right now, I am very pleased with the grades and elevations and the fact they line up perfectly to the topography. This is the highpoint of my track laying ability and uh, patience and determination! You are going to love running this section of the line ... mark my words!
So with that, talk to you next week and...
Carry On!
So, lets check that status shall we?
[ X ] I said some where around October 18th
[ ] Yay, its October 18th.
Truth be told I will be lucky to get the scenery I have to do in 10 short days. But, hey, it could happen. Last week, I left you off with a post about Howell's junction and then followed up with another about the Otisville Tunnel. In the past week, I have laid out track to MP76, installed the road network to just beyond tunnel, completed all bridging, and finally, this morning, starting working on scenery again. I am bringing back our map of Otisville to show where we are at. As you can see we are 12 miles West of Middletown Station and 9 miles West of the track I released on August 19th, almost 2 months ago. What you see in this image is my effective work area until the next release. Now I had been telling you that the scenery was extended to Bowser Road. It is, but parts of it are only at 50%. So now I have 8 miles of trees, grass, houses and telephone poles to put in, plus part or all of the Village of Otisville, NY. The good news is this area is sparsely populated, though there are housing clusters in my area of scenery. Not a big deal - I got this.
What I did spend a boat load of time on was getting the track just perfect, to approach and then run my tunnel through the Shawangunk Mountain Range. The tunnel will be an interesting feature. Currently it is missing its cut rock interior, but it is completely concrete lined and in perfect proportion to the real thing. In fact, the tunnel at the center is 24foot I have mine set at 8 meters (26.24 ft). I have a 'scootch' more to allow for variance in my concrete liner, grade and for some room to add rock. I love these close tolerances it shows off my grande huevos in this project! Testing with double stacks and auto racks was just perfect. But the star is really the track. The grades are dead-on. Even better is the super-el as we have quite the number of curves that really get that photogenic lean goin on with the train. The picture below is the real deal at MP76 and on the route - it looks just like this ... wow!
One thing I didn't mention from my last post was where the heck was the original grade BEFORE the Graham and how did it go over Otisville. 4 Miles West of where the track ends is a place called Guymard. At this place the Old Main climbed up a 1.6% grade to go over the mountain. The original alignment is parallel to the tunnel at Otisville about 200ft to the South. You can see the break in the trees where it laid on Google Maps. Anyway this grade required helpers and the Graham eliminated that need for freight. but they kept it in service for another 45 years for light freight and passenger that ran trough Middletown et all to Harriman. This picture is for my father, who has tried to describe to me how it looked in the 1950s. The center tracks are the Old Main and you can sure see the grade going up, but the Graham goes below it to get to the tunnel - on the two outside tracks! (Read more about that here: http://www.railroad.net/viewtopic.php?f=85&t=54241)
Last up is a shot of the Otisville tunnel uh, nekkid. You might recognize the Sherman Hill 1 track tunnel portal here. But how I made this work was clever. The tunnel objects are parallel to the grade of the track (.25 up, .11 up, and .18 down). How I did it. As you know when you first lay down an object and touch it with the Rotate Widget the perpendicular wheel is lined with object. What I did was to place the object down, then lay track to match the grade of the tunnel section. Then I rotated (by manipulated the numbers representing that axis) until object was parallel the track. Then I lined the object (portal) to the working track, centered, sank it, and checked the distance above the rail to the center of the part to 8 meters. I like round numbers for this reason!. So I was able to have the tunnel rise and fall correctly the grade. Now the reason I did this was there really wasn't decent unfinished tunnel ribbons to work with, and when I used the tunnel from NJCL it messed up the track, in addition to being incorrect.
So in the end and as of right now, I am very pleased with the grades and elevations and the fact they line up perfectly to the topography. This is the highpoint of my track laying ability and uh, patience and determination! You are going to love running this section of the line ... mark my words!
So with that, talk to you next week and...
Carry On!
You do not have the required permissions to view the files attached to this post.
"In business, I prefer to keep company with honest men, so I ship on the Erie"
-
minerman146 - Posts: 2507
- Joined: Fri Mar 20, 2015 8:15 pm
- Location: Cornwall, New York
Re: New York Division-Bergen Line: Episode III, The Erie Rises
![]() by kris120 » Thu Oct 10, 2019 12:43 pm
by kris120 » Thu Oct 10, 2019 12:43 pm
I've got my eyes open :-)
-
kris120 - Posts: 470
- Joined: Mon Jul 22, 2013 3:19 pm
- Location: Augsburg, Bavaria, Germany
Re: New York Division-Bergen Line: Episode III, The Erie Rises
![]() by buzz456 » Sun Oct 13, 2019 11:42 am
by buzz456 » Sun Oct 13, 2019 11:42 am
You do not have the required permissions to view the files attached to this post.
Buzz
39 and holding.
"Some people find fault like there's a reward for it."- Zig Ziglar
"If you can dream it you can do it."- Walt Disney
39 and holding.
"Some people find fault like there's a reward for it."- Zig Ziglar
"If you can dream it you can do it."- Walt Disney
-

buzz456 - Site Admin
- Posts: 20940
- Joined: Sun Mar 21, 2010 8:30 am
- Location: SW Florida
Re: New York Division-Bergen Line: Episode III, The Erie Rises
![]() by minerman146 » Sun Oct 13, 2019 1:00 pm
by minerman146 » Sun Oct 13, 2019 1:00 pm
Ha Buzz - Its time to get our "1960" on!
"In business, I prefer to keep company with honest men, so I ship on the Erie"
-
minerman146 - Posts: 2507
- Joined: Fri Mar 20, 2015 8:15 pm
- Location: Cornwall, New York
Re: New York Division-Bergen Line: Episode III, The Erie Rises
![]() by minerman146 » Tue Oct 15, 2019 1:30 pm
by minerman146 » Tue Oct 15, 2019 1:30 pm
Quick Question - anyone having problems with Out of Memory and the Bergen? I haven't heard a word from anyone yet either way, so I will presume all is well.
Quick Update - Working on scenery today at Howells Junction. I think there may be an update in the air...
Quick Update - Working on scenery today at Howells Junction. I think there may be an update in the air...
"In business, I prefer to keep company with honest men, so I ship on the Erie"
-
minerman146 - Posts: 2507
- Joined: Fri Mar 20, 2015 8:15 pm
- Location: Cornwall, New York
Who is online
Users browsing this forum: No registered users and 2 guests