Creating A Lofted Object (Someone please educate me...)
Re: Creating A Lofted Object (Someone please educate me...)
![]() by PapaXpress » Tue Jun 05, 2012 10:38 pm
by PapaXpress » Tue Jun 05, 2012 10:38 pm
I was correct. My cross section needed sides.
"Just post some random unrelated text. We have members here who can help you with that." ~ Chacal
"When all else fails, read the instructions... if that doesn't work either, try following them." ~ Old Prof
The Grade Crossing - Atlanta North Project - Virtual Rail Creations
-

PapaXpress - Posts: 5147
- Joined: Sat Oct 23, 2010 10:30 pm
- Location: that "other" timezone
Re: Creating A Lofted Object (Someone please educate me...)
![]() by jpetersjr » Wed Jun 06, 2012 1:10 pm
by jpetersjr » Wed Jun 06, 2012 1:10 pm
GreatNortherner wrote:Hi,
"been there, done that". Creating lofts for the first time is a mind-boggling thing -- at least it was to me. However, once I figured out a routine it really turned out to be surprisingly simple, much simpler than the WIki page with all its detail may make it sound.ca2kjet wrote:First, does anyone know of any more in-depth tutorials regarding lofts? Beyond the link I provided and the developer doc?
A simple working loft section, like a road, track or pipeline cross section shape file (they all work the same), can be modeled with only a small amount of steps. I'm going to list the steps in 3DCanvas, but it should work the same in many other modeling tools.
- The first step is to create your desired object and shape it to your desired proportions. In this example I'll be using a pipe as the model. So you'd start by placing a new cylinder in the scene, rotate it so its ends are facing the x/y pane and then mold it into the desired shape.
- Next, select and delete all points except for one of the end sides. Move the pivot point of the remaining face(s) to its center, so that it moves to its z=0 position. (This is crucial! If the pivot of the loft section is not exactly at z=0 of the object, it will fail to render in-game.)
- Now select all the faces again and extrude them along the z axis. Then delete all the faces on the x/y pane, so that only the "hollow pipe" of the extrusiuon remains. Always remember to keep the pivot point at z=0 of the object.
- Texture the extruded object with a texture that tiles along its top and bottom edges. You must use the full height of the texture for the UV coordinates, but you can crop its width when texturing the object.
(Hint: the length of the extrusion from the last step determines at what length the texture gets tiled in-game. So if you do a 10 meter extrusion, you'd get a 10m texture tiling interval. The length of the extrusion has no effect on the 'bending' capacities of the loft section.)- Apply the following materials and names:
hierarchy: 1_1000_loft -- or -- 1_1000_road (both without children) -- or see wiki for track creation, which is slightly more complicated.
shaders: LoftTexDiff.fx or LoftTexDiffTrans.fx (allows transparency)- Export the object to IGS, set up a loft or road section blueprint, enter the data and export to RW.
DONE! Secondly, how do you take a scenery object (such as a bridge, or heck, even a box) and convert it into a lofted object?
While you cannot convert a standard scenery object to a loft, you can attach it to an invisible loft.
All you need is to create a simple loft section, textured with an all-alpha texture, and then add the standard objects as "middle geometry" entries in the loft section blueprint, where you can also set the spacing of the objects. Works great for creating perfectly aligned bridges!
Hope this makes some sense.
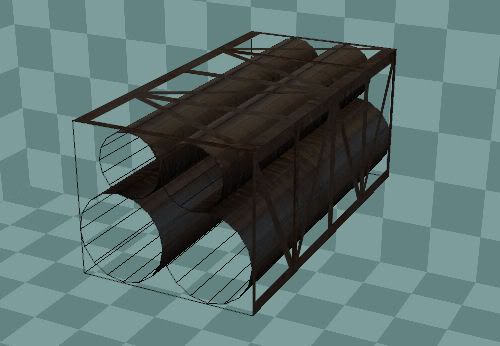
Here's a picture of a loft object cross section:
Cheers,
Michael
I don't understand, can you make a small tutorial that explains how to do this in step by step detail. I'd like to make a lofted 30's style road and also some lofted bridges for my route.
Sincerely jpetersjr
Jonathan Burton Peters Jr, Big J
The Legend Of The New York Central System Shall Live Again In TS2021.
Website
https://jpetersjr1.wixsite.com/big-j-productions
3D Freeware Scenery Developer Since 2011
The Legend Of The New York Central System Shall Live Again In TS2021.
Website
https://jpetersjr1.wixsite.com/big-j-productions
3D Freeware Scenery Developer Since 2011
-

jpetersjr - Posts: 4010
- Joined: Tue Apr 26, 2011 6:31 pm
- Location: Mobile, Alabama, United States,
Re: Creating A Lofted Object (Someone please educate me...)
![]() by jpetersjr » Mon Dec 21, 2015 2:21 pm
by jpetersjr » Mon Dec 21, 2015 2:21 pm
....
Well, finally got a loft to show up in the sim myself, but I'm having this problem with the textures, can anyone tell me why it might be doing this and how to fix it?
...Cheers...
J
Well, finally got a loft to show up in the sim myself, but I'm having this problem with the textures, can anyone tell me why it might be doing this and how to fix it?
...Cheers...
J
You do not have the required permissions to view the files attached to this post.
Jonathan Burton Peters Jr, Big J
The Legend Of The New York Central System Shall Live Again In TS2021.
Website
https://jpetersjr1.wixsite.com/big-j-productions
3D Freeware Scenery Developer Since 2011
The Legend Of The New York Central System Shall Live Again In TS2021.
Website
https://jpetersjr1.wixsite.com/big-j-productions
3D Freeware Scenery Developer Since 2011
-
jpetersjr - Posts: 4010
- Joined: Tue Apr 26, 2011 6:31 pm
- Location: Mobile, Alabama, United States,
Re: Creating A Lofted Object (Someone please educate me...)
![]() by Derek » Thu Dec 31, 2015 4:07 am
by Derek » Thu Dec 31, 2015 4:07 am
I am the loft master... any questions ask (as long as it is in 3DS max... ) :)
For lofts to have end sections they need to be set up in the loft blueprint, (start middle and end) you don't have to fill in the middle section if you don't want to, but they are used for bridges that need legs or fences that need posts.
These end sections are scenery blueprints that are set up interdependently.
If any one needs an example loft with it set up, pm me.
d
-

Derek - Posts: 392
- Joined: Fri Feb 13, 2009 1:35 pm
19 posts
• Page 2 of 2 • 1, 2
Who is online
Users browsing this forum: No registered users and 1 guest